How to Integrate Remote Access into Your System?
 As our solution operates within the browser, we frequently receive inquiries from providers of various electronic services seeking to integrate remote access into their products. Often, the integration process poses challenges and raises additional questions. Therefore, let's delve into one of the most common integration scenarios.
Assuming you have a product designed to work with multiple devices, your customers register in your system, install your software on their devices, and link it to their account. Then, they access their dashboard through their account, view their list of devices, and gain access to certain functionalities. If this sounds like your situation, let's proceed.
Now, the time has come to implement a remote access feature seamlessly within your dashboard. You can achieve this using our solution.
To enable remote access to the devices, you need to install our agent software on the end-user devices and link it to their accounts within our system. Afterward, you can obtain a connection link through our HTTP API and add it to your user dashboard. The process operates as follows:
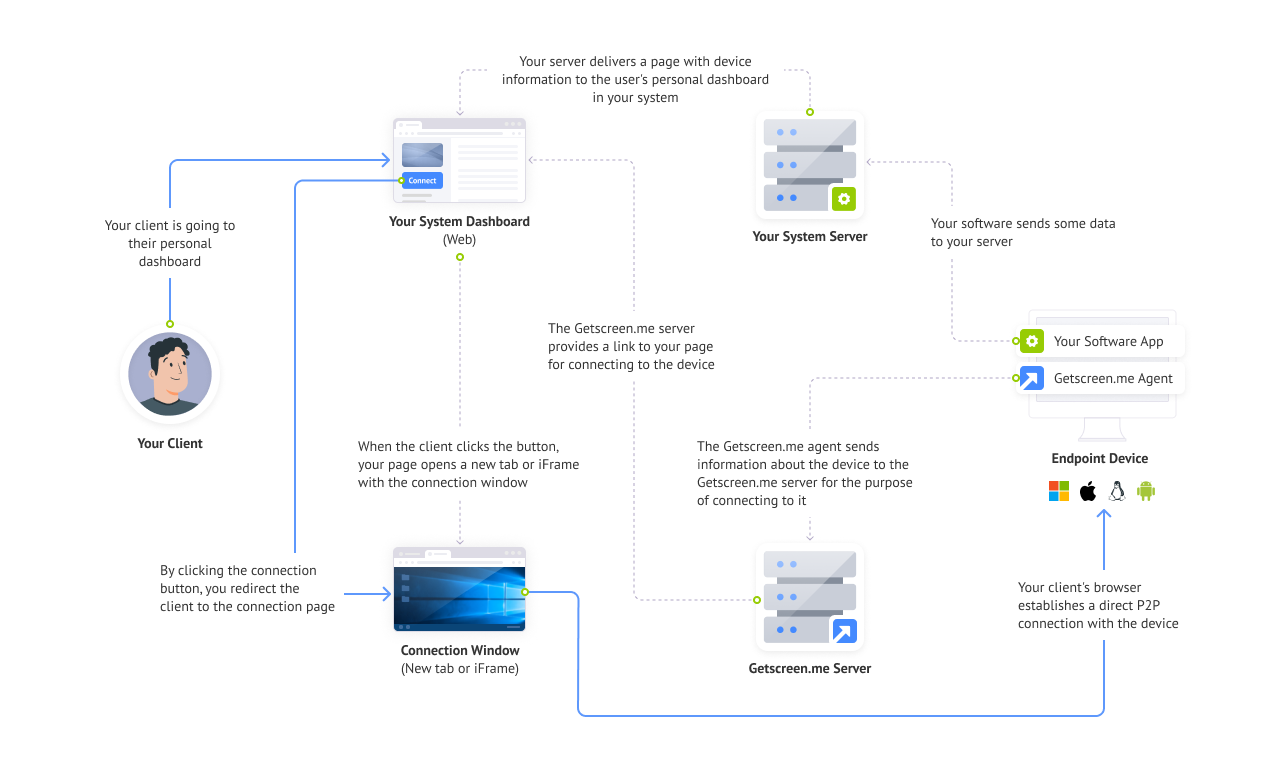
It might seem complex, but it's actually straightforward. Let's break down the integration process step by step.
Register an Account on Getscreen.me
An account is essential for linking all the devices you intend to add to our system. These devices will be exclusively accessible to you, and their quantity will be subject to tariff charges.
To get started, please visit the registration page for the cloud version. Enter your email address and receive a password for login. Make sure to complete your initial login.
Self-Hosted Version
Alternatively, you can deploy your own instance of the Getscreen.me server within your infrastructure. This option is suitable when you want to store all connection data on your own servers and are prepared to manage them independently. Typically, this approach is well-suited for medium and large businesses.
Install the Agent Software on Devices and Link it to Your Account
The agent is a lightweight program responsible for streaming the screen of a remote device and executing commands from a remote operator. Installation is necessary for it to function on behalf of the administrator and start automatically upon device reboot.
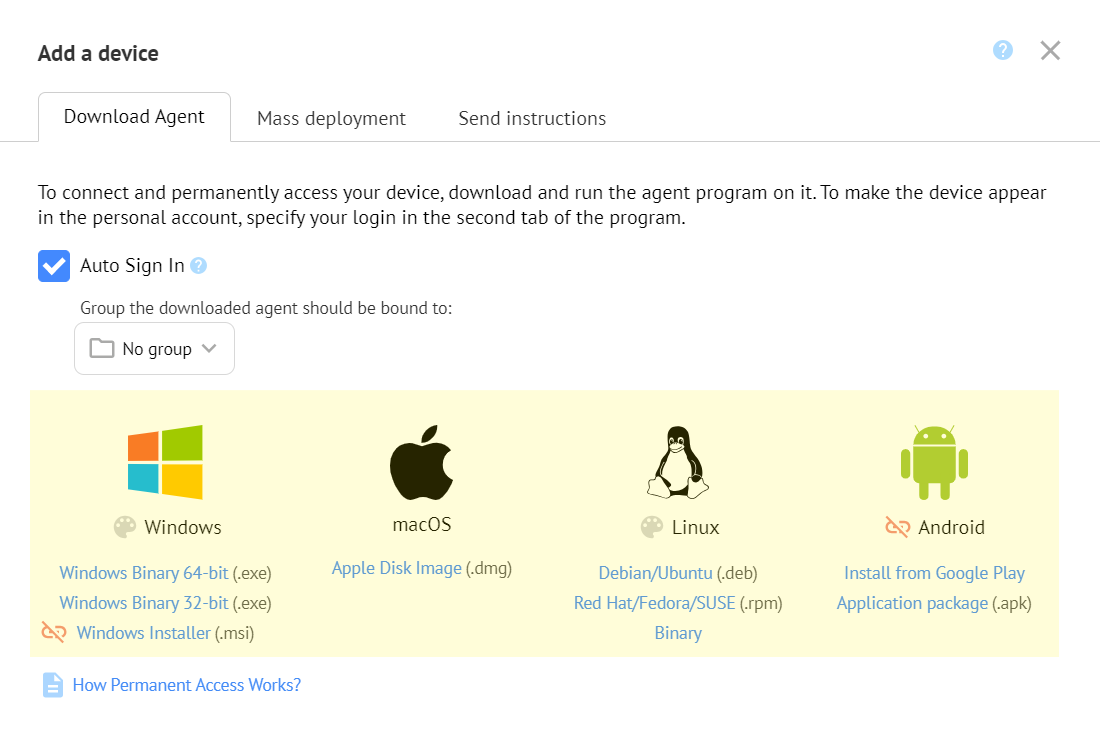
To begin, you need to obtain the agent distribution. On the Permanent Access page in our dashboard, click the "Add Device" button, and you'll find a set of distributions for various operating systems. Select the relevant system and download the distribution file:
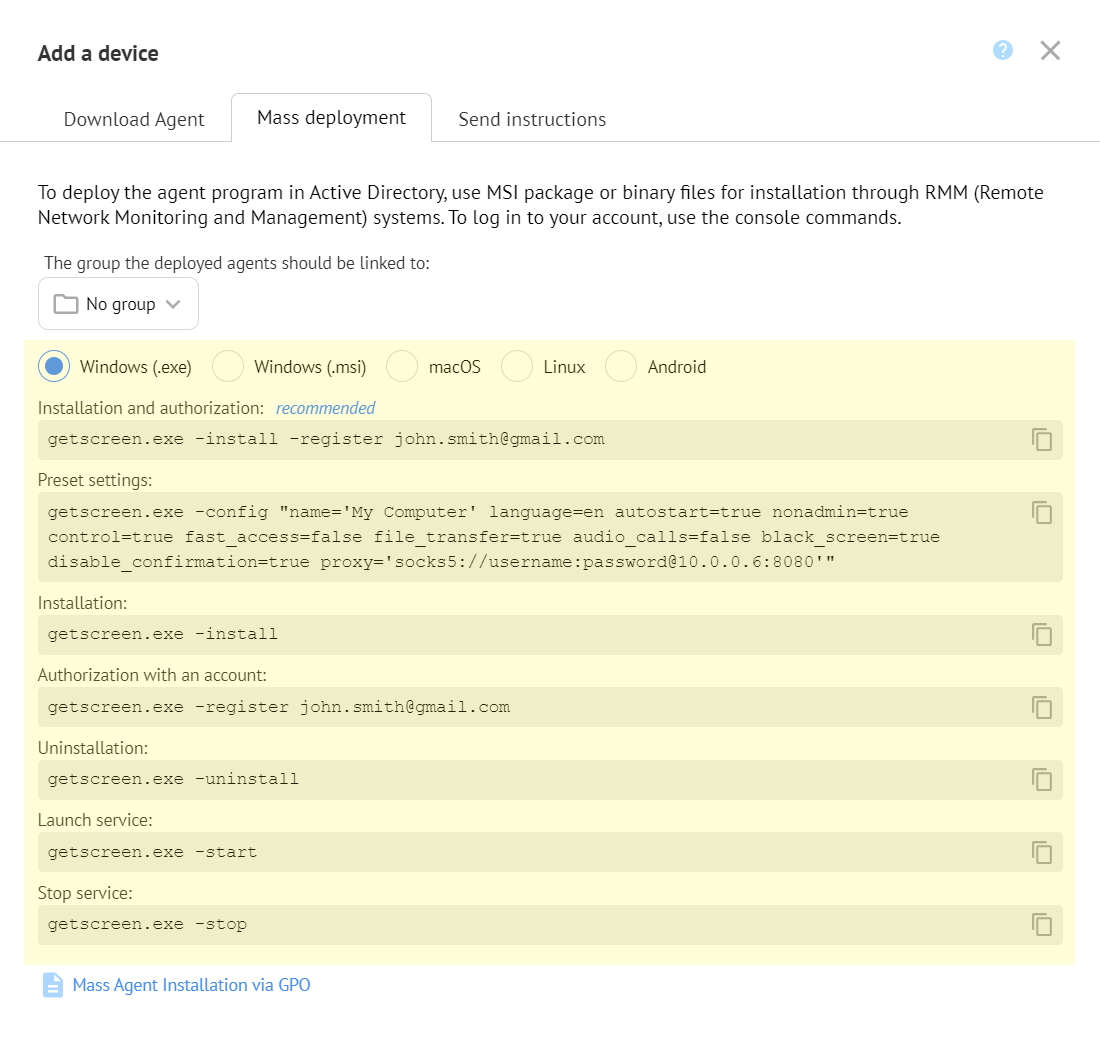
Now that you have the distribution file, you can deploy it to your devices. We won't delve into delivery methods, as this can be accomplished in various ways and depends significantly on your software architecture and system as a whole. However, it's likely that you'll automate this process. So, let's explore automatic installation.
For this, you can utilize command-line commands available for the distribution file. For instance, on Windows systems, you would execute the following command:
The -install parameter initiates the installation, while the -register parameter links the device to your account.
Furthermore, you can configure agent program settings using the -config parameter. For example, in your case, you'll most likely need to disable one-time access links:
For more details on command-line commands and their parameters for different systems, you can refer to the documentation or access them within your dashboard:
Branding
You have the option to customize the agent software's appearance to make it distinctly identifiable as a component of your software. For more information, refer to the article Why Is Branding So Important?.
Link Devices from Our Database to Yours
To ensure that you can connect your users to the appropriate agent when they click the corresponding button in your dashboard's interface, you need to locate agents in our system.
The simplest way to do this is by naming the agent in a way that allows you to identify the device in your database based on its name. For example, you can use a string that combines the account identifier and the device identifier from your database, separated by a hash symbol. You can specify the name using the same -config parameter:
Where:
1001- Account identifier in your system.1- Device identifier in your system.
This naming convention will help you efficiently match agents to devices in your database.
Obtain the Connection Link
Now that we have a list of all your devices with names that are understandable to your system on the Getscreen.me server, let's figure out how to get the connection link.
You'll need this connection link when your user clicks the corresponding button on the device page in your system. You can programmatically obtain this link using the HTTP API in two steps.
Where to Find the API Key?
To authenticate requests to the HTTP API, you will need an API key. You can find it in your dashboard on the Integrations page.
Find the Required Agent
To do this, use the list request agents/list and search for the desired agent by name in the response. You can use the search parameter to search by name:
{
    "data":[ {
        "id":1001,
        "device_id":748268090,
        "name":"1001:1",
        "group":"Accounting",
        "disabled":false,
        "limited":false,
        "link_time":1587837997,
        "last_time":1600374761,
        "geo":{
            "ip":"2.21.31.68",
            "country":"USA",
            "region":"California",
            "city":"Los Angeles"
        },
        "permanent_url":"https://go.getscreen.me/paci",
        "onetime_url":"",
        "preview_url":"https://getscreen.me/preview/1245273f5448a704379da46f476564a592efb17c6a7695adde96247cd7874416GbBzRm6SRLMqrP0YoYFMxCopL6NTzvn8.png",
        "os":"win",
        "version":"1.9.4",
        "online":true,
        "installed":true,
        "favorite":false,
        "owner":"getscreen@yourcompany.com",
        ...
    }, ... ]
}
From the device data in the response, we need the device_id field, which is the unique identifier for the device.
Get the Link
Once you have the device_id, you can obtain the connection link using the method agents/connect.
{
    "data":{
        "url": "https://go.getscreen.me/yourcompany/?connect=20177&llt=66b4kj671pm3abpp5xh17elpnpze245382m9pxbrx313l2xp52hmxqe4e1dekpej&s=c2c5ca25eb4fca787b74a97648e0856951e2b9c7aa02cbf83ac62c81e21a9bab"
    }
}
In the response, you'll receive the final connection link in the data.url field, which you can add to the device card within your system.
Warning
Do not use the links from the permanent_url and onetime_url fields in the agent's data. They are intended for different purposes and will not function correctly in the scenario being discussed.
Add the Connection Button to Your Dashboard
The main question that remains is how the user will open the connection window. There are two options:
- In a new tab
- In a specific area right on your page
In the case of a new tab, you simply add a link to the desired page:
<a href="https://go.getscreen.me/yourcompany/?connect=20177&llt=66b4kj671pm3abpp5xh17elpnpze245382m9pxbrx313l2xp52hmxqe4e1dekpej&s=c2c5ca25eb4fca787b74a97648e0856951e2b9c7aa02cbf83ac62c81e21a9bab" target="_blank">Connect</a>
In the case of an area on the page, you can use an iFrame element:
<iframe style="border:0;width:1024px;height:768px;" src="https://go.getscreen.me/yourcompany/?connect=20177&llt=66b4kj671pm3abpp5xh17elpnpze245382m9pxbrx313l2xp52hmxqe4e1dekpej&s=c2c5ca25eb4fca787b74a97648e0856951e2b9c7aa02cbf83ac62c81e21a9bab" target="_blank"></iframe>
With these simple and straightforward actions, you can enable remote access functionality in any system related to devices.
If you have any additional questions, don't hesitate to contact our technical support.