Integration with Active Directory
 If the accounts of your operators and administrators are already set up in your local Active Directory , you can import them into users within our system. They will be able to log in to their personal accounts using the same usernames and passwords.
For the integration, you will need to install a gateway program within your local network and grant it access to your Active Directory (hereinafter AD). The gateway will retrieve necessary groups from AD and send user data to the Getscreen.me server. Our server will then add them to your account.

Now let's get into more detail about what needs to be done to make this work.
Gateway Installation
Firstly, you need to install the gateway program on a device within your local network. Distribution packages are available for the following operating systems: Windows and Linux. Download the required version using the links:
- https://download.getscreen.me/gateway/gateway-windows.zip
- https://download.getscreen.me/gateway/gateway-linux.zip
Extract the downloaded configuration to a directory for permanent operation. It will contain the following files:
- Executable file of the program
- JSON configuration file
- Help file
Configuration
All settings for the gateway program are specified in the config.json file. This file should be located next to the executable file. The skeleton with all possible options will be in the downloaded archive. It looks like this:
{
    "server": {
        "host": "getscreen.me",
        "token": "your-token",
        "secure": false
    },
    "ldap": {
        "url": "ldaps://ip-adress",
        "user": "your-ldap-user",
        "password": "your-ldap-password",
        "filter": "",
        "login-attribute": "userPrincipalName",
        "secure": false
    }
Description of all options:
| Option Name | Type | Description |
|---|---|---|
server.host * | string | Getscreen.me server address. Default is getscreen.me |
server.token * | string | Token for Gateway Authorization with Your Account. Generated in the personal account on the settings page. See details below. |
server.secure | boolean | Server certificate verification. Default is true. |
ldap.url * | string | Address of the AD server |
ldap.user * | string | Username for connecting to the AD server |
ldap.password * | string | Password for connecting to the AD server |
ldap.filter | string | Additional filter for retrieving the list of AD groups |
ldap.login-attribute | string | LDAP attribute for selecting the field to determine the user's email |
ldap.secure | boolean | AD Server Certificate Verification. Default is true. |
Access to Active Directory
Address of the AD Server
In order for the gateway program to fetch data from Active Directory, you need to specify the path to your AD server. It can be a domain or an IP address with protocols ldap:// (using the default port 389 for TCP connections) or ldaps:// (using the default port 636).
Specify it in the config.json file for the ldap.url field instead of the value ldaps://ip-address.
Username and Password
You will also need to prepare a service account in your Active Directory, which will be used by the gateway to read the structure from AD/LDAP. We recommend creating a separate account with read-only rights within the domain. The password expiration should not be limited to avoid synchronization failures.
Specify the login and password in the config.json file for the fields ldap.user and ldap.password instead of the values your-ldap-user and your-ldap-password, respectively.
For your reference
It is necessary to maintain JSON formatting when specifying the \ character in this field. For example, for the account domain.local\username, an additional \ character should be added:
Token
The token is required to link the running gateway program to your account on the Getscreen.me server. Tokens are generated in your personal account in the settings section on the special page. When generating, check the box for 'Lightweight Directory Access Protocol (LDAP)' and specify an arbitrary name:
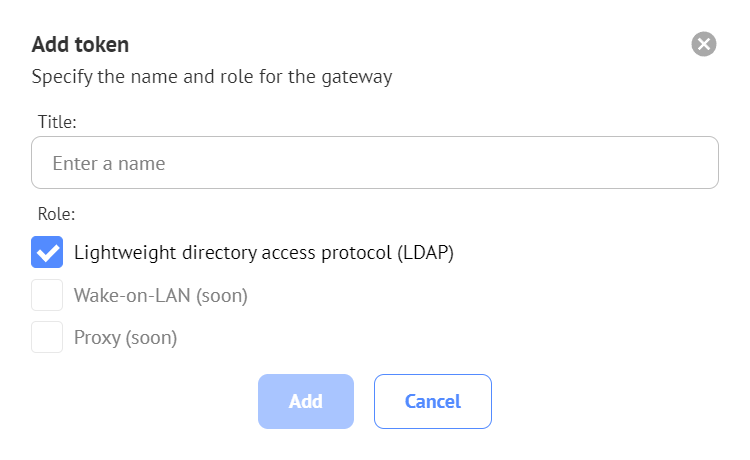
As a result, you will receive a token with an automatically generated key.
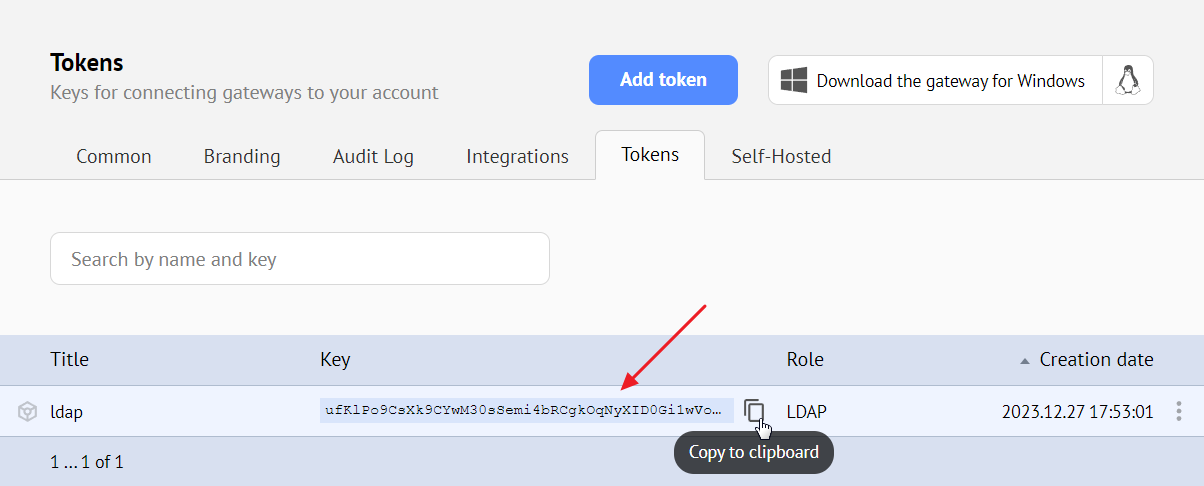
Generate a token and specify its key in the config.json file in the server.token field instead of the value your-token.
Launch
After preparing the configuration, you need to add permissions to execute, install, and run the gateway program. Execute the following commands:
Other Commands
All commands for managing the gateway:
| Name | Description |
|---|---|
./gateway -install | Service Installation |
./gateway -uninstall | Service Uninstallation |
./gateway -start | Service Start |
./gateway -stop | Service Stop |
Check
If everything is configured correctly, when running in console mode, you will see logs like this:
Successful connection establishment with the Getscreen.me server:
Successful connection establishment with your AD server:
13:51:56.059 INFO LDAP connected to 'ldaps://192.168.0.1' as 'ADFS\Administrator' base: 'DC=ADFS,DC=TEST,DC=ME'
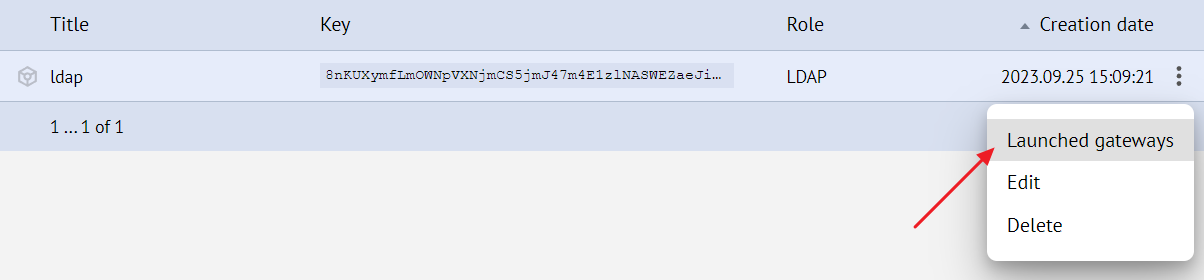
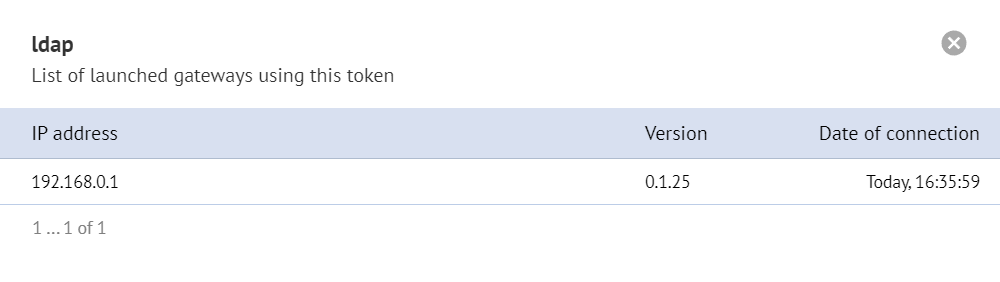
You can also check the running gateways for a specific token in your personal account:
Selection of Groups for Import
Now that the gateway is successfully running, you need to select the groups in AD that need to be imported into the Getscreen.me account.
To do this, you need to create a department in the Teams section. In the Users tab, select the radio button 'Synchronize with a group from Active Directory' and choose the desired group.
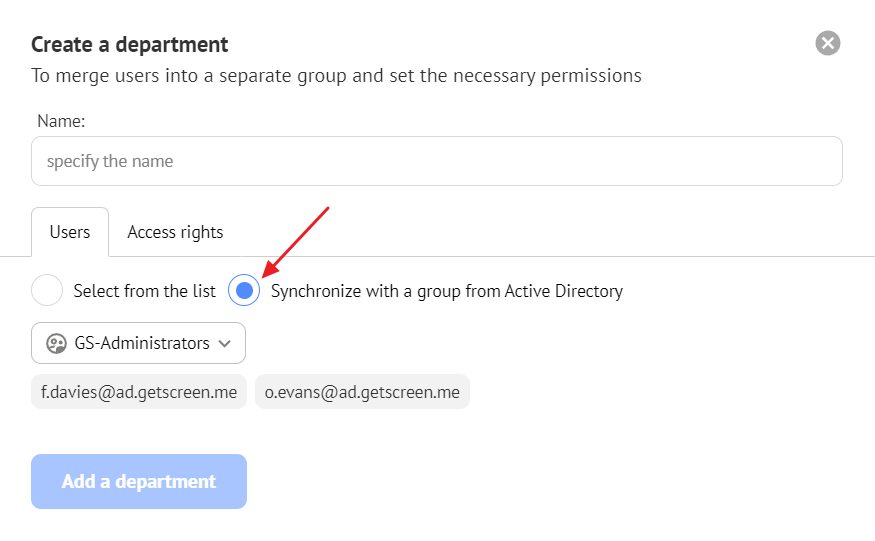
This way, the group from AD will be linked to the department in Getscreen.me. After creating the department, your users will be imported into it and inherit all the permissions of the selected department.
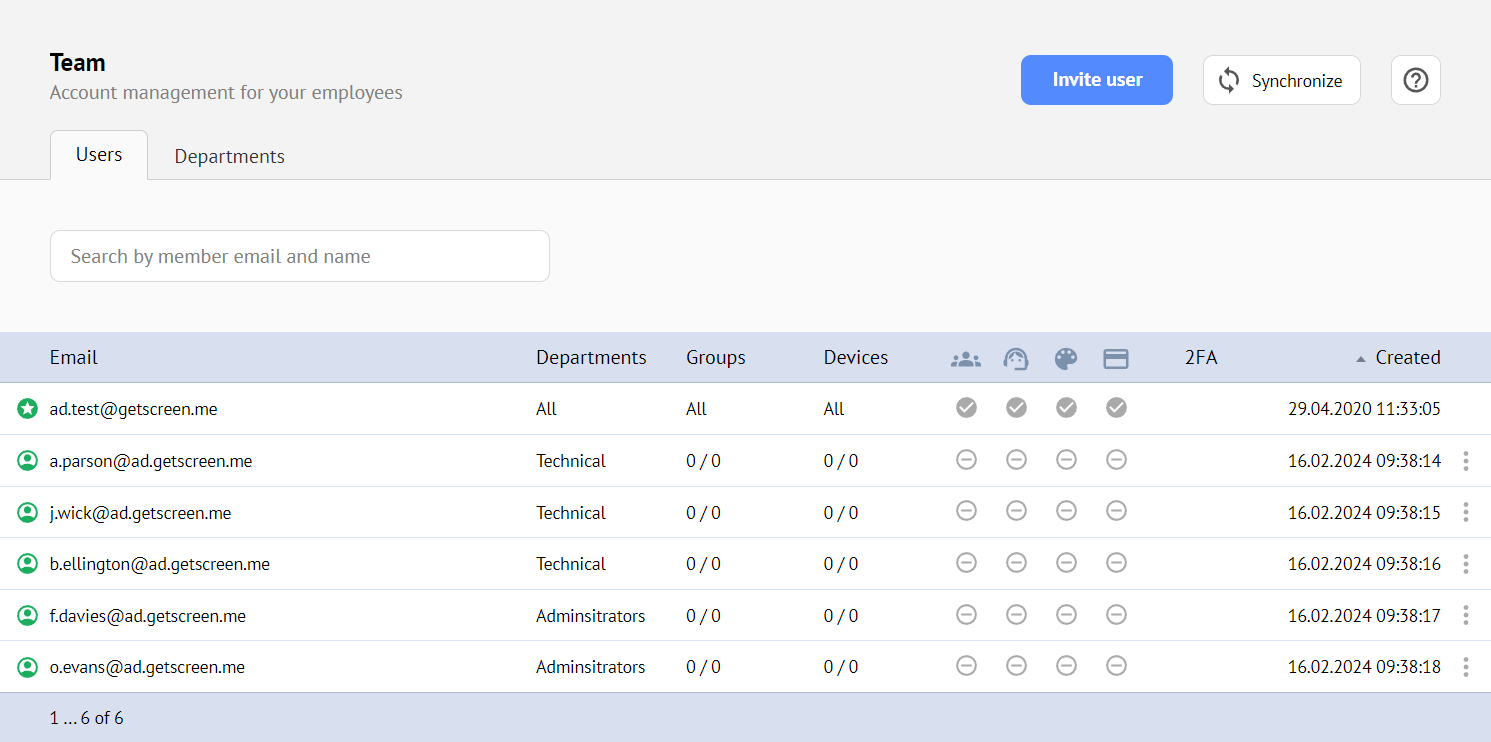
Departments that are linked to a group from AD will be marked with the icon, and all users will inherit the permissions of this department.
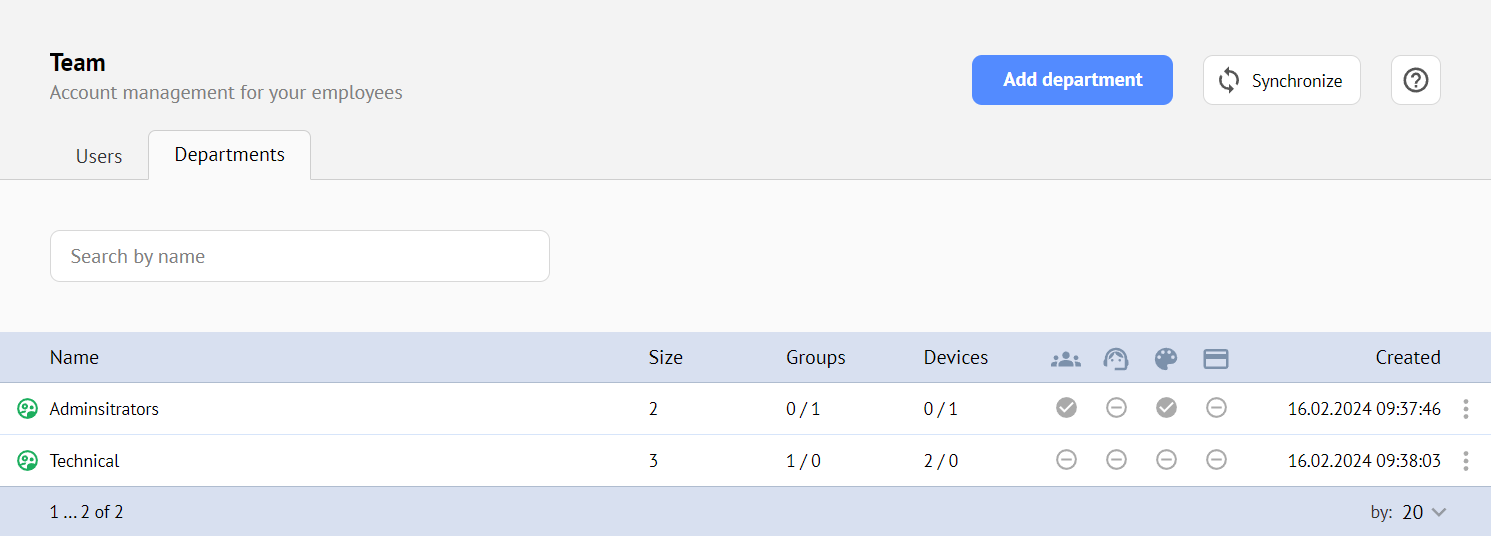
The imported users will be marked with the icon and will not be available for editing.
Synchronization
Synchronization of imported users between your Active Directory and the Getscreen.me server will be performed automatically at the specified frequency in the settings, as well as manually by clicking a button in the interface:

Automatic Synchronization Settings
You can override the default synchronization settings on your Settings page in the Automatic synchronization with Active Directory block.
Frequency
The time interval at which automatic synchronization of users from Active Directory will be triggered if integration is enabled. The minimum value is 5 minutes, and the maximum is 7 days.
User Timeout
The time after which department users will be disabled if synchronization of the department fails. The minimum value is equal to the synchronization period, and the maximum is 30 days. By default, it is 10 times the synchronization frequency.
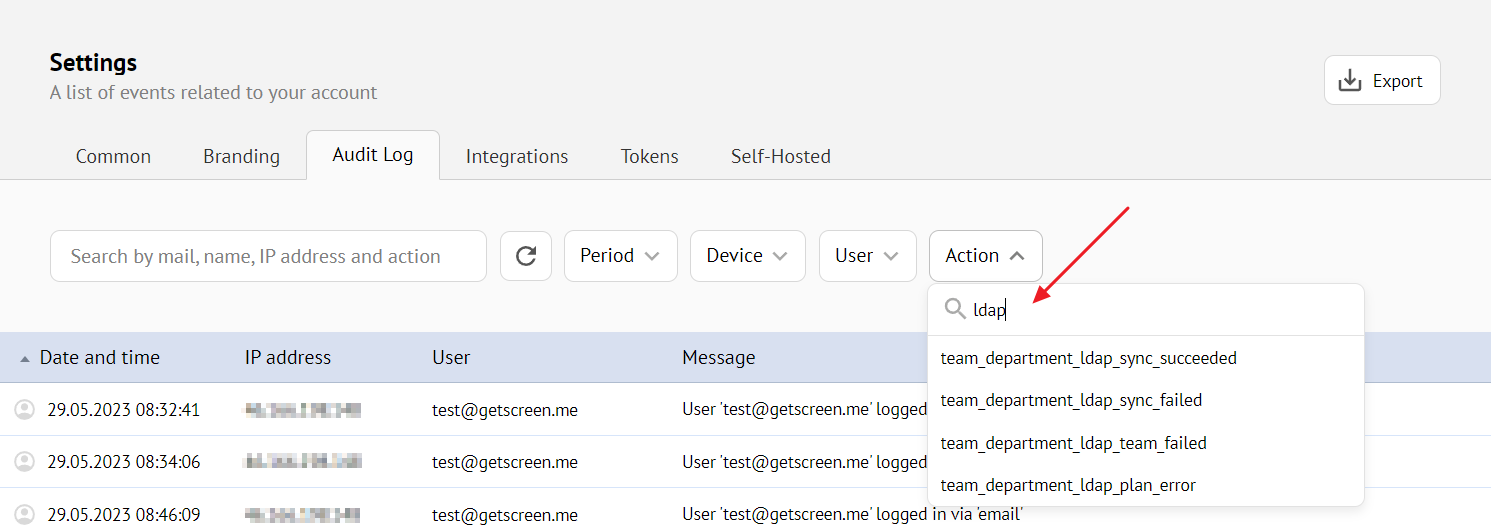
Errors and Event Log
When errors occur, the synchronization button will have a corresponding indicator:

You can find all integration events with the gateway in the general event log. Use actions prefixed with team_department_ldap_* for event filtering: